
How to Use a Glucose Meter
Knowing how to use a glucose meter correctly is one of the foundational skills of diabetes self-management. A glucose meter (glucometer) is a small portable device that measures the concentration of glucose in a fingertip blood sample in seconds, giving you real-time information about your blood sugar between clinical laboratory visits. But the reading is only as good as the technique behind it — errors in preparation, lancet use, strip handling, or blood collection can produce readings that are 20–40 mg/dL off from the true glucose level, leading to unnecessary treatment or missed abnormalities. This guide walks through every step of accurate glucose meter use, covers the components of the system, explains common errors and how to avoid them, and provides the reference framework for interpreting results. For the clinical reference ranges that put your readings in context, see our blood sugar chart for adults. For guidance on when and how often to test, see our guide on how often blood sugar should be checked.
Understanding the Components of a Glucose Monitoring System
A home glucose monitoring system consists of four interconnected components, each of which must be functioning correctly for the overall system to produce an accurate reading. Understanding what each component does — and what can go wrong with it — is the foundation of reliable home testing.
The glucose meter: The meter is the electronic device that reads the test strip and displays the glucose result. Modern meters use an electrochemical reaction between blood glucose and an enzyme (typically glucose oxidase or glucose dehydrogenase) on the test strip to generate a small electrical current proportional to the glucose concentration. The meter measures this current, applies a calibration algorithm, and displays the result in mg/dL (in the United States) or mmol/L (in most other countries) within five to ten seconds. Meters range from basic models that simply display a number to advanced models with Bluetooth connectivity, color-coded result alerts, large displays for low vision, and extensive memory. The meter itself does not require regular calibration by the user — calibration is built into the test strip chemistry — but it should be kept clean (especially the strip port), stored at room temperature, and protected from dropping or exposure to extreme temperatures or humidity. All meters should be accompanied by a quality control test (using the supplied control solution) when new strips are opened, when a reading seems inconsistent with expectations, or after the meter has been exposed to extremes.
Test strips: Test strips are single-use strips coated with enzymes and electrodes that react with glucose in the blood sample. They are meter-specific — a strip from one manufacturer will not work in another manufacturer’s meter. Test strips have an expiration date that must be respected; expired strips can produce inaccurate readings, typically falsely low. Strips should be stored in their original container with the cap tightly closed, at room temperature, away from heat, humidity, and direct sunlight. Opening the strip container and leaving it open exposes the remaining strips to humidity that can degrade the reactive coating. Each strip should be removed from the container immediately before use and the cap replaced promptly. Strip cost — typically $0.50–$1.50 per strip without insurance — is the primary ongoing expense of home glucose monitoring and should be factored into medication and monitoring frequency discussions with a healthcare provider.
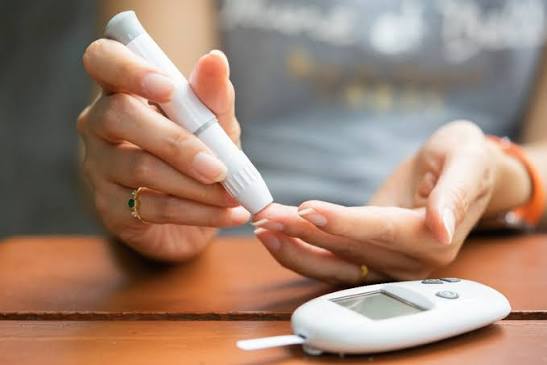
Lancing device: The lancing device is a spring-loaded pen-like tool that holds a lancet and drives it into the fingertip at a controlled depth and speed. Most lancing devices have an adjustable depth setting that controls how deep the lancet penetrates. The appropriate depth varies by skin thickness — most adults do best at a setting of 2–4, with higher numbers for thicker skin or callused fingers and lower numbers for thin-skinned or sensitive individuals. The correct depth produces enough blood for the strip (typically 0.5–1 microliter) without requiring prolonged or forceful squeezing of the finger. Lancing devices require minimal maintenance: they should be kept clean and the lancet must be changed regularly (more on this below). Most devices are provided with or alongside the glucose meter when obtained with a prescription.
Lancets: Lancets are the tiny needle-like devices loaded into the lancing device. They are single-use by design — each lancet is sterile and has a precisely manufactured tip that produces a clean, minimally painful puncture. Reusing lancets dulls the tip (visible under a microscope after even one use), making subsequent punctures more painful and the wound less clean. Fresh lancets at the correct lancing depth cause only momentary minor discomfort; dull lancets cause disproportionate pain without producing a better blood sample. Lancets should be changed with every test or at minimum daily, and old lancets should be disposed of in an approved sharps container rather than in household trash.
Step-by-Step: How to Use a Glucose Meter Correctly
The following sequence, followed consistently at every test, produces the most accurate and clinically meaningful home glucose readings.
- Gather supplies. Collect the glucose meter, a test strip, the lancing device with a fresh lancet, and a recording device (paper log or phone app). Having everything ready before beginning avoids having to handle supplies mid-test with a blood-tipped finger.
- Wash hands with soap and water and dry completely. This is the most important preparation step. Food residue, especially fruit juice, sugary drinks, or food handled immediately before testing, can transfer from the finger to the blood sample and falsely elevate the reading by 30–50 mg/dL or more. Plain soap and water removes these substances; complete drying before lancing prevents dilution of the blood sample. Alcohol swabs are not required if hands are washed, though they can be used when soap and water are unavailable — but the alcohol must fully evaporate before lancing to prevent dilution.
- Insert a fresh test strip into the meter. Most meters turn on automatically when a strip is inserted. Insert the strip with the correct orientation (the contact end goes in, the reaction end where blood is applied faces out). On meters that require coding, ensure the code matches the strip vial if applicable — most modern meters use auto-coding and do not require this step.
- Load a fresh lancet in the lancing device and set depth. Remove the cap of the lancing device, insert a fresh lancet, and replace the cap. Set the depth appropriate for your skin thickness. Cock the device (pull back the plunger). Adjust the site selector to the fingertip or alternate site position per the device design.
- Lance the side of the fingertip. Place the lancing device against the side of the fingertip — not the center pad, which has more nerve endings. Press firmly against the skin and trigger the device. Rotate between fingers and spots to prevent callus buildup. The ring and middle fingers of the non-dominant hand are often preferred by right-handed individuals.
- Obtain an adequate blood drop without forceful squeezing. Allow the blood drop to form naturally. If the drop is inadequate, gently stroke the finger from base to tip with moderate pressure. Avoid forceful squeezing — this pushes extracellular fluid (not blood) into the sample, diluting it and lowering the glucose reading falsely. If adequate blood consistently requires force, increase the lancing depth setting.
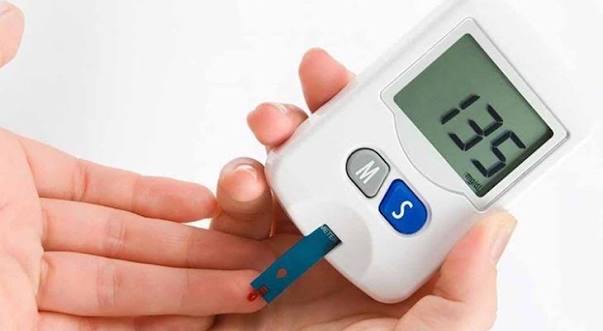
- Apply blood to the test strip. Touch the edge of the blood drop to the sample entry point on the test strip. Modern strips use capillary action to draw blood in automatically when the drop touches the correct spot — you should see the meter confirm the sample was adequate. Do not smear blood across the strip surface. If the sample is insufficient, most meters allow a second application within a short time window — check the specific meter instructions.
- Read and record the result. The result appears within five to ten seconds. Record it immediately with the time and any relevant context (fasting, two hours after dinner, before exercise, felt dizzy). Meter memory is available but contextual notes are not automatically stored — a log provides much richer pattern data.
- Falsely high result: Sugar or food residue on finger — fix: wash and dry hands before every test
- Falsely low result: Expired strips, excessive squeezing of finger, or alcohol not dried — fix: check strip dates, gentle pressure only, let alcohol fully evaporate
- Insufficient sample error: Lancing too shallow, dehydration, cold hands — fix: increase depth setting, warm hands first, stay hydrated
- Inconsistent readings: Reusing lancets, improper strip storage, meter stored at extremes — fix: fresh lancet per test, keep strips capped in original container, store meter at room temperature
- Reading conflicts with symptoms: Run a control solution check; if still inconsistent, use laboratory glucose to verify meter accuracy
Interpreting Your Glucose Meter Reading
Once you have a result, the next step is placing it in the correct clinical context. A glucose reading by itself is only meaningful when paired with the time of testing and its relationship to your last meal. The same reading of 145 mg/dL can be entirely within target range (two hours after dinner in a person with Type 2 diabetes), mildly above target (fasting in a person with diabetes managing to a target of below 130 mg/dL), or a concerning elevation (fasting in a person without a diabetes diagnosis, well above the prediabetes threshold of 100–125 mg/dL). Our comprehensive guide on what is normal blood sugar and our blood sugar chart for adults provide the complete reference ranges for each testing context. For fasting readings specifically, our guide on fasting blood sugar explained covers what morning readings reveal and how they should be interpreted. For post-meal readings, our guide on post-meal blood sugar explained provides the clinical reference ranges for one- and two-hour post-meal glucose. And for the big picture of why accurate home glucose readings matter for long-term health — what sustained glucose control achieves in terms of complication prevention — our guide on why blood sugar matters for long-term health provides the complete evidence-based context.
Maintaining Your Meter and Supplies
A glucose meter and its supplies require straightforward but consistent maintenance to continue performing accurately over months and years of use. The meter itself should be cleaned regularly — most manufacturers recommend wiping the exterior with a slightly damp cloth and cleaning the test strip port carefully with a dry cotton swab if buildup is visible. The meter display and buttons should not be submerged in water or sprayed with liquid cleaners. Most meters have a battery life of several hundred to several thousand tests depending on model; low battery warnings should be addressed promptly to avoid losing meter memory. Test strips should always be stored in their original capped vial at room temperature — not in the bathroom (too humid), not in the car (too hot), and not in the refrigerator (condensation when brought to room temperature can damage strips). The lancing device should be cleaned according to manufacturer instructions and should never be shared between individuals due to infection control requirements. Lancets should be disposed of in an approved sharps container rather than in regular household waste. Most pharmacies sell small personal sharps containers; many local health departments have sharps disposal programs that accept full containers. For anyone building a complete home blood sugar monitoring routine — not just mastering the mechanics of a single reading but establishing a sustainable testing schedule and recording system — our guide on home blood sugar monitoring provides the comprehensive framework for making monitoring work as an ongoing practice rather than an occasional check. And for anyone whose glucose readings from the home meter are consistently surprising — either higher than expected, more variable than expected, or inconsistent with how they feel — our guide on A1C vs blood glucose explains how the home meter readings relate to the A1C result from clinical laboratory testing and what to do when the two seem inconsistent. Understanding both measurements, and how to use your glucose meter correctly to generate reliable data, puts you in the strongest possible position for productive conversations with your healthcare team about your glucose management and the adjustments that will be most effective for your individual situation. For context on what specific glucose readings mean in terms of diabetes diagnosis, prediabetes risk, and the spectrum of early signs of high blood sugar that elevated meter readings may reflect, the full library of blood sugar guides at Horizon Health Guide provides the educational context that transforms glucose numbers from abstract data points into meaningful health information. Our guide on what blood sugar is and the foundational explanation of how the body controls blood sugar round out the understanding needed to use a glucose meter not just mechanically but meaningfully — knowing what your readings reflect about your underlying metabolic state and what changes might move those readings in a healthier direction over time.
Alternate Site Testing: What It Can and Cannot Replace
Some glucose meters are approved by the FDA for use with alternate testing sites — typically the forearm, upper arm, thigh, or palm — in addition to the fingertip. Alternate sites are appealing because they are often less sensitive and therefore less painful than the fingertip. However, alternate site testing has a critical limitation that is important to understand before using it for management decisions.
Interstitial fluid at alternate sites (forearm, palm) reflects glucose more slowly than fingertip capillary blood. During periods of rapidly changing glucose — such as the thirty to sixty minutes after a meal when glucose is rising quickly, or during exercise when glucose is falling, or after treating a hypoglycemic episode — alternate site glucose can lag behind fingertip glucose by 10–20 minutes and 20–40 mg/dL. During stable glucose periods (several hours after the last meal, or when glucose has been stable overnight), alternate site and fingertip readings agree well. This distinction has practical safety consequences: if you use an alternate site reading at a time when glucose is changing rapidly, you may miss the actual current glucose value. For this reason, most diabetes guidelines and meter manufacturers specify that fingertip testing should always be used when: symptoms of hypoglycemia are present; glucose is suspected of being low for any reason; recent insulin was taken; a meal was eaten within two hours; exercise is recent or ongoing; and before driving. Alternate site testing is appropriate for stable-state glucose assessment — checking a fasting reading after a calm overnight period, or checking several hours after a meal when glucose has had time to stabilize. Understanding these limitations prevents alternate site testing from being misapplied in situations where fingertip accuracy is clinically important.
When to Replace Your Meter and Verify Accuracy
Glucose meters can degrade over time or after specific events, producing readings that drift from the true glucose value without giving any obvious error indication. Knowing when to check meter accuracy — and when it may be time to replace the meter — protects against the gradual erosion of monitoring quality that can occur when the same meter is used for years without verification.
Running quality control solution: Every meter comes with or includes a glucose control solution — a liquid with a known glucose concentration that produces a predictable reading on the meter’s test strips. Running a control test verifies that the meter and strips are working together correctly. The control reading should fall within the range printed on the strip vial (or control solution label). A control reading outside this range indicates a problem with the strips, the meter, or the technique — not necessarily the actual person’s glucose. Control solution should be run when opening a new vial of strips, when a reading seems inconsistent with how the person feels or with recent readings, after the meter has been dropped or exposed to extremes, and whenever reliability is in question. Control solution expires and should be replaced per the label.
Comparing to laboratory glucose: The most meaningful way to verify home meter accuracy is to perform a fingerstick reading at the same time as a blood draw for a laboratory venous plasma glucose — within five minutes of the draw. The meter reading should be within ±15% of the laboratory result. Discrepancies larger than this warrant investigation. A consistent pattern of home meter readings running lower than laboratory results suggests the meter may be reading low (check strip batch, control solution, hematocrit effects from anemia). A pattern of higher home readings compared to laboratory results might indicate residual food contamination of the fingertip, or a meter calibration issue. For anyone whose A1C result seems inconsistent with their home glucose readings — an important and common clinical pattern — our guide on A1C vs blood glucose: what is the difference provides the framework for understanding why discrepancies occur and what they mean for interpreting glucose control.
When to replace the meter: Most meters last several years under normal use, but should be replaced if: the display is damaged or difficult to read; the meter consistently fails quality control despite fresh strips and proper technique; the manufacturer discontinues the model and strip supply becomes unreliable; or a newer model with significantly better accuracy or features becomes available and covered by insurance. A healthcare provider or diabetes educator can help evaluate whether a current meter is performing adequately or whether an upgrade would meaningfully improve monitoring quality. For the broader context of home blood sugar monitoring — choosing between a traditional fingerstick meter and continuous glucose monitoring, building a recording system, and communicating glucose data to a healthcare team — our guide on home blood sugar monitoring provides the complete practical framework. And for guidance on the specific glucose patterns that different testing times reveal — fasting patterns, post-meal responses, overnight trends — our guides on fasting blood sugar, post-meal blood sugar, and morning blood sugar provide the detailed clinical context for interpreting what the meter is showing at each key time of day. Using a glucose meter correctly — with proper technique, well-maintained supplies, and an understanding of how to place each reading in its clinical context — transforms a simple number into actionable information for managing blood sugar and protecting long-term health.
Sources: American Diabetes Association. Standards of Medical Care in Diabetes — 2024. Diabetes Care. 2024;47(Suppl 1):S20–S42. • U.S. Food and Drug Administration. Blood Glucose Monitoring Devices. FDA; 2023. • Freckmann G, et al. Continuous Glucose Profiles in Healthy Subjects Under Everyday Life Conditions. J Diabetes Sci Technol. 2010;4(5):1157–1164.
Really well-written article on how to use a glucose meter. It is refreshing to see an article that acknowledges individual variation rather than one-size-fits-all advice. I wish I had found this article earlier — would have saved a lot of confusion.
Finally a resource that explains how to use a glucose meter in plain language. The specific numbers and thresholds mentioned are exactly what I needed to understand my results. Forwarding this to others in my support group who are dealing with similar issues.
I shared this article on how to use a glucose meter with my doctor and they appreciated the level of detail. I especially valued the explanation of why these recommendations exist, not just what they are. This is going into my health folder that I bring to every doctor’s visit.