
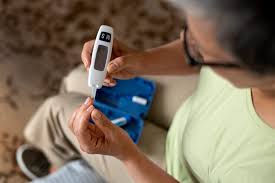
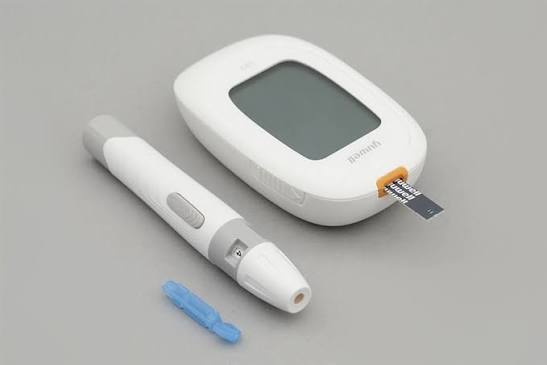
Choosing among the best blood glucose monitors is a decision that affects daily diabetes management in practical, concrete ways — how easy testing is, how accurate the numbers are, how much it costs over time, and whether the data integrates with apps or care team systems. The market offers traditional fingerstick blood glucose meters, continuous glucose monitors (CGMs), and hybrid approaches, at price points ranging from nearly free (with insurance) to several hundred dollars per month out of pocket. This guide covers the key features that distinguish higher-quality monitors from mediocre ones, the accuracy standard that matters most, the cost structure to understand before committing, and how to match monitor type to your specific monitoring needs and lifestyle.
The Accuracy Standard That Matters Most
ISO 15197:2013 — What It Requires and Why It Matters
The international accuracy standard for blood glucose monitors is ISO 15197:2013 — the current benchmark established by the International Organization for Standardization for self-monitoring blood glucose systems. The standard requires that 95% of meter readings fall within 15 mg/dL of the laboratory reference value for glucose levels below 100 mg/dL, or within 15% of the reference value for glucose levels at or above 100 mg/dL. A meter that claims ISO 15197:2013 compliance has been tested against this standard in independent laboratory conditions. Most major current-generation meters from established manufacturers — including OneTouch, Accu-Chek, Contour, FreeStyle, and True Metrix — meet or exceed this standard. The practical implication of a 15 mg/dL accuracy range: at a glucose reading of 90 mg/dL, the true value could be as low as 75 mg/dL or as high as 105 mg/dL and still be within the standard. At treatment decision thresholds — whether to eat a carbohydrate to correct hypoglycemia, whether a glucose level is high enough to require additional insulin — this range can matter. Meters that exceed the standard — with accuracy within 10 mg/dL or 10% — provide readings that more reliably guide treatment decisions, particularly for adults on insulin where glucose readings directly determine dosing. When evaluating a meter, check whether the manufacturer specifies ISO 15197:2013 compliance on the product or package labeling.
Meter Accuracy in Real-World Conditions Versus Laboratory Testing
Laboratory accuracy testing is conducted under ideal conditions — proper hematocrit, no interfering substances, freshly drawn venous blood samples, trained users. Real-world accuracy can differ. Several factors reduce meter accuracy in daily use: insufficient blood sample size (too small a sample on the test strip produces an unreliable reading); extreme temperature (most meters specify an operating range of 50–104°F; testing in very cold or very hot environments produces inaccurate results); altitude above 10,000 feet (reduced atmospheric oxygen affects some electrochemical detection methods); certain medications including acetaminophen at high doses, some vitamin C supplements, and uric acid in gout can interfere with glucose oxidase-based detection methods used in many meters; and severe anemia or polycythemia (very low or very high hematocrit) shifts accuracy for some meters. Understanding these real-world interference factors — and choosing a meter designed to minimize the most relevant ones for your lifestyle and health conditions — extends the accuracy advantage beyond what the laboratory standard alone captures. Our blood sugar log and tracking guide covers how to record meter readings systematically alongside the contextual information — meal timing, activity, symptoms — that makes the data clinically useful rather than just a stream of numbers.
Key Features to Evaluate in a Traditional Fingerstick Meter
Sample Size and Alternate Site Testing
Modern meters require very small blood samples — typically 0.5 to 1.0 microliters — making testing less painful and easier than earlier-generation meters that required larger drops. Meters requiring 0.5 microliters or less are generally preferable for adults who test frequently (multiple times daily) because the smaller lancet wound needed for a smaller sample reduces cumulative fingertip soreness. Alternate site testing — using blood from the forearm, palm, or upper arm rather than the fingertip — is supported by many meters and reduces fingertip discomfort. The important limitation of alternate site testing: during rapidly changing glucose conditions — immediately after meals, during exercise, or while hypoglycemia is developing — alternate site glucose readings lag behind fingertip readings by 5–20 minutes because capillary blood in less-perfused sites equilibrates more slowly with arterial blood. For routine fasting or pre-meal testing, alternate site testing is accurate. During hypoglycemia symptoms or rapid post-meal changes, fingertip readings are more reliable. Understanding this limitation prevents alternate site readings from producing misleadingly reassuring results during the exact conditions where accurate real-time glucose is most critical.
Data Storage, App Connectivity, and Trending
The best blood glucose monitors for adults who want to track patterns over time — to share data with a care team, identify fasting glucose trends, or evaluate the impact of dietary changes — offer digital connectivity and data storage beyond simple on-meter memory. Most current meters store 500–1000 readings with dates and times, which can be reviewed through a connected smartphone app or downloaded to a computer via USB. Bluetooth connectivity — available in meters from OneTouch, Accu-Chek, FreeStyle, Contour, and others — allows automatic syncing to manufacturer apps or third-party platforms like Apple Health, Google Health, or mySugr without manual data entry. For adults who share glucose data with a diabetes care team, digital records provide far more useful information than verbal reports of remembered readings — and several major health systems now accept digital glucose logs through patient portal uploads. The app functionality varies significantly between manufacturers: some apps provide only a log and time-of-day graphs; others provide pattern analysis, estimated HbA1c, pre-meal versus post-meal average comparisons, and care team sharing features. Evaluating the companion app — not just the meter hardware — is an important step when connectivity and data analysis matter to the monitoring goal. Our blood sugar log guide covers how to use digital monitoring data to identify patterns and prepare for care team conversations.
Test Strip Cost — The Ongoing Expense That Matters Most
The meter purchase price is typically the smallest part of the total cost of traditional blood glucose monitoring — test strips are the ongoing expense that determines the true annual cost. Test strip prices vary from approximately $0.10 per strip for generic store-brand strips to $1.00 or more per strip for premium branded strips without insurance coverage. An adult testing four times daily uses approximately 120 strips per month — at $0.50 per strip, that is $720 per year in test strip costs, before considering lancets, lancing devices, and control solution. Insurance coverage substantially changes this calculation — most Medicare and private insurance plans cover test strips with a copay, often making branded strips comparable or cheaper to the insured patient than generic options. Before purchasing a meter, the most important cost question is not the meter price but whether your insurance plan covers that meter’s test strips, at what copay, and with what quantity limit per month. Selecting a meter whose strips are not covered by your insurance plan — or are covered at a higher tier requiring prior authorization — can result in substantially higher annual monitoring costs than choosing the meter whose strips your plan covers most generously. Consulting your insurance plan’s formulary or speaking with a pharmacist about covered meter brands is the most financially efficient step in the meter selection process.
Continuous Glucose Monitors — When They Offer More Value
How CGMs Differ From Fingerstick Meters
Continuous glucose monitors measure glucose every 1–5 minutes through a small sensor inserted under the skin — typically in the abdomen, upper arm, or thigh — that measures interstitial fluid glucose rather than blood glucose. The sensor transmits readings wirelessly to a receiver or smartphone, providing real-time glucose readings, trend arrows showing whether glucose is rising or falling and at what rate, and retrospective time-series data showing the full glucose curve over hours and days. The trend information is a qualitative leap beyond individual point-in-time fingerstick readings: knowing that glucose is 95 mg/dL and rapidly falling is clinically different from knowing it is 95 mg/dL and stable — the former calls for a small carbohydrate intake, the latter does not. This trend data substantially reduces hypoglycemia risk for adults on insulin who previously relied on periodic fingerstick measurements that could miss rapid glucose drops between measurements. Current leading CGM systems include the Dexcom G7, Abbott FreeStyle Libre 3, and Medtronic Guardian 4 — each with different accuracy profiles, wear duration, and whether they require fingerstick calibration or are factory-calibrated. The FreeStyle Libre 3 is the most widely prescribed CGM in the United States, particularly for Type 2 diabetes management, partly due to its relatively lower cost compared to real-time CGM systems with active alarming. Our continuous glucose monitors pros and cons guide covers CGM selection in depth — including the real-time versus flash monitoring distinction, insurance coverage, and the populations most likely to benefit from upgrading from fingerstick monitoring. The doctor visit checklist that includes discussing glucose monitoring technology at the annual diabetes visit — including whether a CGM is appropriate — is in our doctor visit checklist for diabetes guide. The annual diabetes care checklist that covers monitoring technology review alongside clinical laboratory testing is in our annual diabetes care checklist. The diabetes apps guide covering the digital ecosystem around glucose monitoring — including which apps work with which monitors — is in our diabetes apps guide. The FDA’s blood glucose monitoring devices resource covers the regulatory standards and cleared devices for both traditional meters and CGM systems in the United States. The ADA’s blood sugar monitoring guidance covers the American Diabetes Association’s current evidence-based recommendations on monitoring frequency, targets, and technology selection. The NIDDK’s blood glucose monitoring guide provides a comprehensive overview of monitoring options, techniques, and the role of glucose data in diabetes self-management.
Testing Technique — Why Accuracy Depends on How You Test
Blood Sample Preparation and Strip Insertion
Even the most accurate meter produces unreliable results when used with poor technique. Several technique factors consistently affect fingerstick accuracy in real-world use. Washing hands with soap and water before testing removes residual food sugars — particularly fruit sugars, which can falsely elevate glucose readings if present on the fingertip when the lancet penetrates. Alcohol wipes are a common substitute, but alcohol must be allowed to fully evaporate before lancing — a wet alcohol surface dilutes the blood sample and can cause falsely low readings. Warming hands before testing — by rubbing them together or briefly running warm water over the fingertip — increases capillary blood flow and produces a larger, more reliable blood drop. Squeezing or milking the finger to produce a larger blood drop should be avoided — excessive tissue pressure forces interstitial fluid into the blood sample, diluting the glucose concentration and producing falsely low readings. The first small blood drop after lancing should be wiped away; the second drop, produced by gentle pressure, provides a more accurate sample from capillary blood rather than tissue fluid disturbed by the puncture. Applying blood to the test strip edge — rather than dropping blood on top — allows accurate wicking for most current meter strip designs. These technique steps take approximately 30 seconds additional time but can meaningfully improve result reliability, particularly at glucose levels near treatment decision thresholds.
Lancets, Lancing Devices, and Depth Settings
The lancet gauge — its thickness — directly affects testing comfort. Higher gauge numbers indicate thinner lancets; 28–33 gauge lancets are standard for modern fingerstick testing. Ultra-thin 33 gauge lancets produce the least pain and smallest wound, but may not produce adequate blood volume from adults with poor peripheral circulation, cold hands, or calloused fingertips — requiring either a depth adjustment or a lower gauge lancet. Adjustable depth settings on lancing devices — typically 1–7 on a numerical scale — allow matching penetration depth to individual skin thickness. Most adults find a depth of 2–4 adequate for fingertip testing; older adults with thinner skin often use depths of 1–2. Rotating lancet puncture sites across all fingertips — avoiding the same site repeatedly — prevents callus formation that reduces blood flow. Lancets should be replaced after each use — a used lancet’s tip deforms microscopically, creating a rougher surface that increases tissue trauma and pain with repeated use. Using the same lancet for extended periods is a common cause of increased testing discomfort that adults attribute to sensitivity rather than lancet wear. A box of 100 lancets typically costs $3–8, making lancet replacement after each use a very low-cost improvement to testing experience.
Choosing Between a Traditional Meter and a CGM — A Decision Framework
When a Traditional Fingerstick Meter Is Sufficient
For many adults with Type 2 diabetes — particularly those managing primarily through diet, exercise, and non-insulin medications — a traditional fingerstick meter provides adequate glucose information for self-management decisions. Testing 1–4 times daily (fasting, pre-meal, and 2 hours post-meal at key meals) provides meaningful data about baseline glucose, meal impact, and medication effectiveness without requiring the continuous monitoring that a CGM provides. The lower cost of traditional monitoring — with strips covered by insurance — makes it the practical default for adults without compelling reasons to use a CGM. The situations where a traditional meter is typically sufficient include: Type 2 diabetes managed without insulin; prediabetes monitoring where occasional spot-checks guide dietary and exercise decisions; and Type 1 or Type 2 diabetes managed with basal insulin only (one injection daily) where glucose variability is relatively predictable and does not require continuous trending data. For these adults, the key meter selection criteria are accuracy (ISO 15197:2013 compliance), insurance strip coverage, ease of use, and data connectivity if digital tracking matters.
When a CGM Offers Meaningfully Better Information
The clinical situations where a CGM provides information that a traditional meter genuinely cannot are well-defined. Adults on multiple daily insulin injections or insulin pumps — where glucose readings directly determine insulin doses multiple times daily — benefit substantially from continuous trending data that prevents hypoglycemia between testing intervals. Adults who experience hypoglycemia unawareness — reduced or absent symptomatic warning before glucose drops to dangerous levels — need the real-time alerting that only CGMs provide. Adults with highly variable glucose patterns — wide swings between high and low throughout the day — benefit from seeing the full glucose curve rather than isolated point readings that miss the valleys and peaks between them. Adults whose hypoglycemia occurs overnight — while they are unable to wake and fingerstick test — benefit from CGM alerts that can wake them or a caregiver before glucose reaches a dangerous level. Adults who find fingerstick testing painful, inconvenient, or anxiety-provoking enough to avoid adequate testing frequency may test more consistently with a CGM — improving monitoring adherence and glucose management as a result. The CGM versus fingerstick decision is best made collaboratively with a diabetes care team member who can assess individual clinical situation, monitoring goals, insurance coverage, and lifestyle factors that determine whether the additional cost and technology complexity of CGM is warranted. Our continuous glucose monitors pros and cons guide covers this decision in full detail — including the insurance coverage landscape for CGM systems and the specific accuracy and reliability differences between leading CGM models.
Special Populations — Meters for Specific Needs
Older Adults and Dexterity Limitations
Adults with arthritis, reduced grip strength, or fine motor limitations may find certain meter designs more manageable than others. Meters with larger test strip handling areas, larger display screens with high-contrast text, and audio readout options — which announce the glucose reading verbally — remove significant barriers to accurate self-testing for adults with vision impairment or difficulty reading small displays. The Prodigy Voice, Accu-Chek Instant, and some FreeStyle models include audio features. Test strips that insert into the meter with minimal precision — or that are pre-inserted and require only a single button press — are easier for adults with dexterity limitations than strips requiring careful alignment under lighting conditions. Lancing devices with a simple one-step cocking mechanism are more manageable than those requiring multiple steps. Evaluating the physical ergonomics of a meter — holding it, inserting a strip, applying blood, reading the display — during a pharmacy demonstration before purchase helps identify which designs are most practical for individual dexterity limitations. Many pharmacies have demonstration meters available for handling evaluation before purchase commitment. The blood sugar log templates guide covering simplified recording systems — including large-print log formats and app-based logging that reduces handwriting demands — is in our blood sugar log templates guide. The medication list template guide covering organized medication documentation alongside glucose monitoring data — providing the complete information set at every care visit — is in our medication list template for diabetes care guide. The questions to ask at diabetes appointments — including what to discuss about monitoring technology with your care team — are in our questions to ask about Type 2 diabetes guide. The long-term diabetes care plan guide covering how monitoring technology selection fits within the broader 5-year diabetes management framework is in our long-term diabetes care plan guide. The building healthy habits guide covering how monitoring data guides dietary and exercise decisions — making the monitoring investment useful rather than just informative — is in our building healthy habits with diabetes guide.
Control Solution Testing — Verifying Your Meter Is Working Correctly
Control solution testing is a quality-check step that most adults with diabetes skip but that provides meaningful assurance that both the meter and the test strips are functioning correctly. Control solution is a liquid with a known glucose concentration — when tested with the meter and strips, the result should fall within a specific range printed on the strip vial. Testing with control solution is recommended whenever a new vial of test strips is opened (to verify the new batch), after dropping the meter, when a reading seems inconsistent with how you feel, or when strips have been exposed to extreme heat or humidity. A control solution result that falls outside the printed range indicates that either the strips are compromised (expired, heat-damaged, or contaminated) or the meter is malfunctioning — in either case, trusting fingerstick readings from that meter-strip combination for treatment decisions is inappropriate until the problem is identified. Control solutions are inexpensive (approximately $5–10 per bottle), expire after a specific period once opened (check the label — typically 3 months), and are specific to a particular meter brand. Including a monthly control solution test in your monitoring routine takes under two minutes and provides confidence that the accuracy specifications the meter was cleared for are actually being achieved in your specific device and strip lot.
Sources: International Organization for Standardization. ISO 15197:2013 — In vitro diagnostic test systems: requirements for blood-glucose monitoring systems for self-testing in managing diabetes mellitus; Freckmann G et al. Continuous glucose profiles in healthy subjects under everyday life conditions. Journal of Diabetes Science and Technology 2007; ADA Standards of Care in Diabetes 2024; FDA Blood Glucose Monitoring Device Guidance 2024; NIDDK Blood Glucose Monitoring Guide 2024.
Thank you for covering best blood glucose monitors: what to so thoroughly without being overly technical. It is refreshing to see an article that acknowledges individual variation rather than one-size-fits-all advice. Forwarding this to others in my support group who are dealing with similar issues.
As someone dealing with this personally, the best blood glucose monitors: what to section was very helpful. I appreciate that the article is careful about distinguishing between what is known and what is still being researched. This is exactly why I prefer this website over generic health platforms.
Thank you for covering best blood glucose monitors: what to so thoroughly without being overly technical. It is refreshing to see an article that acknowledges individual variation rather than one-size-fits-all advice. Will definitely be coming back to this site for more health information.